Wednesday, December 15, 2010

Hudson - Setting up Windows Slave

Several of my colleagues  had trouble installing Hudson slave on a Windows machine. I was at a client site, and so decided to write step-by-step instructions for installing the same. It worked, and everyone was happy. So, here comes the instructions with screen shots.

1.    Log into the windows machine where the slave needs to be setup.
2.    Open up a browser and connect to the master. http://yourmaster:yourport. In my case, it is http://windowsserver:7223
3.    Click on Manage Hudson -> Manage Nodes. This will bring the following page:


4. Click on New Node. Provide a slave name and check on Dumb Node, and click OK.


5.Next, provide all the details for this slave


6. Save the setting. Put the slave.jar in a folder. From this folder run the following command:
java -jar slave.jar -jnlpUrl http://yourmasterserver:7223/computer/windowsslave/slave-agent.jnlp
windowsslave is the name you gave for the slave machine

7. This will start the slave, and you should see it running as follows:

 8.    And the slave should be listed on your Hudson Master dashboard as shown below:

The folder specified while configuring the slave will have the following slaves libraries downloaded:
  • maven2.1-interceptor.jar
  • maven-agent.jar
  • maven-interceptor.jar
Wasn't that easy?

Monday, December 13, 2010

Hudson – Creating users with no CAPTCHA

There was a requirement from one of the clients to have no CAPTCHA while signing up for new users in Hudson. A few searches showed that many had requested for this feature, and it was implemented using the security-no-captcha.hpi plugin.

I also heard from the client that they use open JDK and that the CAPTCHA doesn't show up when using this. I also saw a bug report on Hudson's issue list at the following link:

* Hudson, OpenJDK and CAPTCHA
* A second issue

Attached below are steps to install this plugin.

1. Open up a web browser and go to URL http://yourserver:yourhost where yourserver is the name of the system running Hudson. In my case it http://localhost:7223. This should bring the Hudson dashboard, click on the Manage Hudson link on the left hand side. This opens up the following page:


2.Click on Manage Hudson - Manage Plugins. Click now on the Available tab,
in the Authentication and User Management, check the Security No CAPTCHA check box, scroll all the way down click on the Install button at the far right hand corner.
3. Restart Hudson and you should be able to see the plugin in the Installed tab.
4. Within the Manage Hudson -> Configure System, now select the “Hudson’s own user database (Without a CAPTCHA)” check box. Within the Authorization tab, create a User, and check all options.


7. Save this configuration. And when you click on sign up at the right hand corner, no CAPTCHA is shown.
Hudson has been amazing me from day one, I just love to use this CI tool, and recommend every client to do so.

Thanks, Kohsuke Kawaguchi for such a wonderful tool.

Monday, November 29, 2010

Spring Security : Combining Basic and Form based Authentication

There are many use cases where you would want to combine both basic and form based authentication when using Spring Security. This was possible with earlier releases of Spring Security but a lot more involved. However, if you can wait for a couple of months for Spring Security 3.1.0 to be released, it can be done by defining multiple http elements in your Spring Security application context file. Multiple http elements couldn't be defined in Spring Security 3.0.X.

The use case we had was to support basic authentication for our REST services, and form based authentication for the same application with a WEB interface.

If you download the Spring Security 3.1.0 M1 release, the PDF also has an example with the same use case scenario.

Add the following http elements in your application context file, change the URL patterns accordingly and you are all set:


Isn't this so simple and easy? 

Thursday, November 4, 2010

Generating SHA256 passwords in Python

n my last post I had a small example showing how to secure your passwords using Spring Security 3.0.4. We needed a simple client written in Python to do the same from a command line. Of course, if you were using Java, it would have been four lines written in a simple Main class and you could run it in either Eclipse or NetBeans and get the hash of the password.

    public static String passwordEncoder(String plainText) {
        MessageDigest digest;
        try {
            digest = MessageDigest.getInstance("SHA-256");
            digest.reset();

            byte rawPassword[] = digest.digest(plainText.getBytes("UTF-8"));
            String hash = (new BASE64Encoder()).encode(rawPassword);
            return hash;
        } catch (Exception e) {
            e.printStackTrace();
            return null;
        }
Since we needed a simple command line utility to do the same, to write the same in Python was even more simpler. This example was run on my Ubuntu Virtual machine.

import getpass
from hashlib import sha256
import base64
    def main(self):
        self.generate_hash_password()
       
    def generate_hash_password(self):
       
        print "Enter password to hash :",
        password1 = getpass.getpass()
        print "Confirm :",
        password2 = getpass.getpass()
        if password1 == password2:
            print "Both passwords matched"
            hash = sha256(password1).digest()
            encoded = base64.b64encode(hash)
            print " SHA 256 base 64 encoded password ", ":", encoded
        else:
            print "Both passwords do not match"

   
if __name__ == "__main__":
    try:
        password_encoder = PASSWORD_ENCODER()
        password_encoder.main()
    except KeyboardInterrupt:
        exit(0)

Now run this from a command line as shown below:


The getpass library doesn't echo the password on the command line. Simple and easy.
.

Wednesday, November 3, 2010

Spring Security 3.0.4 and PasswordEncoder

We needed to encode our passwords stored in a simple properties file using SHA 256, and also later base64 encode this hash. A few searches in the Spring documentation, and downloading the sources did the trick.
So, attached below are the configuration changes you need to make for the same:

Add the following entries to your Spring Application Context file:

The property encodeHashAsBase64 if enabled, will give us the base64 encoded string of the hash.  The rest-users.properties should now have the username, based 64 encoded password, and all the roles associated to that user.


Simple , easy and elegant.

I will keep posting as and when I discover new things about Spring Security 3.0.4

Tuesday, November 2, 2010

Spring Security 3.0.4

I started using the latest Spring Security 3.0.4 for my current project. Spring Security is being used to secure our REST Services. I didn't find any good tutorials or samples on the web for this latest version.

With a lot of trial and error, I was finally able to get Authetication and Authorization working. Of course, I did read the SpringSecurity.pdf which comes with the download and worked on some samples before implementing the same in my project.

Have you used Spring Security, the latest version? Are there any books which cover this version? I did see "Spring in Action" for this new release. However, it is still in MEAP release.

Share your thoughts. I will write a detailed post of Securing REST with Spring Security.

Thursday, October 14, 2010

Hudson and Listen on Localhost only

I have been using Hudson for almost close to 3 years and have seen many many requirements from clients. Have been amazed by what all can be done using Hudson. Just yesterday, had a rather unusual requirement that Hudson was supposed to listen to only localhost. No user from outside the machine that Hudson was installed should be able to access it. A little bit of research, trial and error, and I was able to get this resolved in a few minutes.

So, next time you have this requirement to run Hudson locally and not be able to access from outside this machine, follow this very simple instruction.

In the normal way of starting Hudson, you will be using either your shell or batch file, which has the following command:

java -jar hudson.war --httpPort=7223

Now, when you don't want external access to Hudson other than localhost, start Hudson as follows:

java -jar hudson.war --httpPort=7223 --httpListenAddress=localhost

Try accessing Hudson from the same machine everything works fine:
Now, try accessing Hudson from another machine, in my case a Virtual Machine, you will see something like this:

Exactly what you want, right?
To see all other options you can provide while using Hudson and the default Winstone servlet container, take a look here:

Thursday, August 5, 2010

Hudson, Ubuntu 10.04 and OpenJDK

Yesterday, I was trying to install and run Hudson server on my Ubuntu 10.04 VM. I was constantly getting the following error message. I even tried to create a slave on this Virtual Machine from my Windows Master, and even that was not working. The error message was :

java.security.ProviderException: Could not initialize NSS
 at sun.security.pkcs11.SunPKCS11.(SunPKCS11.java:201)
 at sun.security.pkcs11.SunPKCS11.(SunPKCS11.java:103)
 at sun.reflect.NativeConstructorAccessorImpl.newInstance0(Native Method)
 at sun.reflect.NativeConstructorAccessorImpl.newInstance(NativeConstructorAccessorImpl.java:57)
 at sun.reflect.DelegatingConstructorAccessorImpl.newInstance(DelegatingConstructorAccessorImpl.java:45)
 at java.lang.reflect.Constructor.newInstance(Constructor.java:532)
 at sun.security.jca.ProviderConfig$3.run(ProviderConfig.java:262)
 at sun.security.jca.ProviderConfig$3.run(ProviderConfig.java:244)
 at java.security.AccessController.doPrivileged(Native Method)
 at sun.security.jca.ProviderConfig.doLoadProvider(ProviderConfig.java:244)
 at sun.security.jca.ProviderConfig.getProvider(ProviderConfig.java:224)
 at sun.security.jca.ProviderList.getProvider(ProviderList.java:232)
 at sun.security.jca.ProviderList.getService(ProviderList.java:330)
 at sun.security.jca.GetInstance.getInstance(GetInstance.java:157)
 at java.security.Security.getImpl(Security.java:696)
 at java.security.AlgorithmParameters.getInstance(AlgorithmParameters.java:130)

I wasn't able to find anything related to this exception in the Hudson user groups. A simple test to make sure I was running the correct version of Java, helped fix things. The VM was running openJDK, and after linking to the correct Sun JDK the problem went away. I was able to run the master on this VM< and also on a similar VM was able to run the slave as well.

meera@ubuntu:~/src/meera$ java -version
java version "1.6.0_20"
Java(TM) SE Runtime Environment (build 1.6.0_20-b02)
Java HotSpot(TM) Client VM (build 16.3-b01, mixed mode, sharing)

So, if in case you see this error next time, make sure and check which Java you are using.

Tuesday, August 3, 2010

Hudson and CLI

I have been doing some very neat stuff using Hudson the past couple of weeks. This is something which is really awesome, and am amazed at Hudson every time I use it. Hudson has a built-in command line interface which I have been using recently. I didn't find good documentation for doing some simple things like creating a job, copying a job and so on.. Hence, decided to write a blog entry so would help me and many others as  well.

First and foremost is to download the cli library, and you can do so easily from the Hudson-> Manage Hudson ->Hudson CLI link as shown below.

Now, click on the link and you will be presented with another page, were you click the download hudson-cli.jar link.
 

Next, open a command line and browse to where the hudson-cli.jar was downloaded, or even better copy to your favorite location.

At this point you should be able to run commands to create a job, enable a job, disable, copy and also delete a job. So, lets look at some of the commands.

1. Display help
java -jar hudson-cli.jar -s http://localhost:7223/ help


2. Create a Job, use the following command. config.xml is a sample configuration file which hudson needs for creating a job. You can find one in the hudson home folder. You also need to provide the configuration file next to the job name. Double click on the image below to see the parameters for passing in the configuration file. For some reason, each time I tried entering the same, blogpost automatically reformatted the same.
java -jar hudson-cli.jar -s http://localhost:7223/ create-job meera


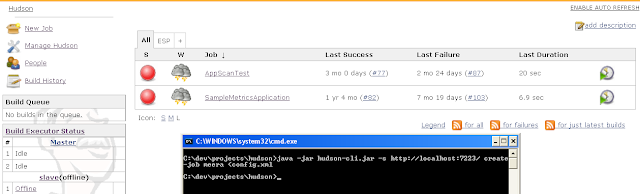
If you go to the hudson main page, you should be able to see a new job called meera created.


Lets see a few more commands which can be executed:

3. Copy Job
java -jar hudson-cli.jar -s http://localhost:7223/ copy-job meera copy-meera

4. Disable a Job
java -jar hudson-cli.jar -s http://localhost:7223/ disable-job meera

5. Enable a Job

java -jar hudson-cli.jar -s http://localhost:7223/ enable-job meera

6. Delete a Job
java -jar hudson-cli.jar -s http://localhost:7223/ delete-job meera

Once you get an idea of how to use the command line interface, it is very easy to automate many things by using this interface.

I am also working on creating  a JAVA API for using the Hudson Remote API, and also a few build scripts as well. Will keep this blog updated on each of those as soon as I have them working.

Monday, August 2, 2010

Doxygen and Python

I had written several articles on Javalobby on a couple other blogs on using Doxygen. You can read the posts with all the links at Javadoc or Doxygen.

I have been using and working on Python the last couple of months. On Friday, I integrated Doxygen with Pyhton on my Ubuntu machine and hence this post to document the details of the same.
  1. Download and install doxygen using the following command:
  • sudo apt-get install doxygen
  • Once installed, run doxygen -g to generate the default configuration file.  I renamed this as Doxyfile.config.

2.Download and install
  • doxypy from http://code.foosel.org/doxypy

3. Now change to the directory where doxypy is extracted and cd doxypy-0.4.2/run,  
        sudo python setup.py install
4. Now, assuming doxygen and doxypy is correctly installed, run the following command:
       doxygen Doxyfile.conf

Once you have the documentation generated, you can publish the results on the Hudson dashboard. See the earlier link to tutorials to do the same.

Monday, May 24, 2010

2010: Year of Python?

I definitely think I suffer from Herpetophobia. Just seeing anything which crawls scares me to death. So, when I was given this book on Python in late 2007, I refused to even read the book; the cover had a huge picture of Python. The book I am talking about was "Programming Python". At that time, I was the Team Leader for the Book Review team at Javalobby. I donated that book to one of my colleagues. Not sure if they reviewed the book or not.

I am still scared of reptiles. However, last week I was asked at work if I would be interested in working on a project which uses Python. I agreed, since I am up for all challenges. I was a bit scared when my colleague said he has a book of Python and went to bring the same. This book however doesn't have the reptile anywhere on its cover.

Having programmed in Java and .NET for many many years now, yep don't even remember how long I have been using these languages, it definitely is a welcome change to learn a completely different language. I have enjoyed working in Java and .NET all these years. I have spent almost 3 days now, working the samples and going over each and every topic and am amazed at this language.I think it was indeed a good decision on my part to have agreed to work on this new project.

A couple of days more, and I am sure I will be preaching everyone to use Python. So, have you used Python? What are your thoughts? What are things you like and dislike about this language? Share your thoughts.

Thursday, January 14, 2010

Maven - It Isn't ALL Bad!

Nope, this isn't a blog post to start another war between Ant and Maven. I am and will remain a huge fan of Ant for many years to come. Having used it extensively in the last decade, I know the in's and out's of writing huge huge build files. Yes, huge build files.

However, I was trying a few new projects and all the samples I tried were mostly in Maven. It had been my New Years Resolution for many years to learn Maven. But, they remained just that , New Years Resolutions and never got a chance to actually either learn or use it in any of my projects.

Last week, I had a few hours of free time, and decided to actually try Maven from scratch. I was always intimidated by the POM; which is THE PROJECT OBJECT MODEL. No idea why. I tried a few simple commands and was able to clearly understand and learn Maven the right way.

If given an option now, what will I choose for my new project, can you guess? Nope, you thought I would choose Maven, you are wrong. I would still use Ant. However, if I am writing an article, or giving a presentation, I would rather use Maven. It is so simple to create a new project, where Maven does all the work for you.

  • Open a command prompt, and type the following command:
    • mvn archetype:create -DgroupId=org.meeras.sample -DartifactId=sample -DpackageName=org.meeras.sample
 The output in the command window will be as such:


 At this point, Maven created the entire directory structure for me as shown below. How cool is that?


  • The POM at this point is very simple, with just JUnit as it's dependency. If you want to see effective POM, which Maven always executes from, run the following command to see all the Parent POM's and also the Super POM.
    • mvn help:effective-pom
The output now within the command window should be something like this:

If you are having trouble finding from where Maven is getting all the information, just try the above command. You will see the merged POM, which can help in many ways.

  •  Maven creates a simple Java class with a static main which you can run from the command line where the POM.xml file resides .This following command compiles, tests, packages and installs the sample application.
    • mvn install .
Now that you have the jar file, you can run it.
C:\dev\projects\maven-samples\sample>java -cp target/sample-1.0-SNAPSHOT.jar org
.meeras.sample.App
Hello World!
C:\dev\projects\maven-samples\sample>

In one step I was able to create an entire project structure. That's the biggest plus for Maven. Convention over Configuration.

So, that's it for today. I will write more about Maven the next time I do something even more interesting.